
This Blog Post Isn't finished and I will be updating with more details soon. Please Ask Questions If I Forgot Anything.
I posted this short Video Clip on Instagram and a few people emailed asking for plans on how to build one.
All Credit for the Airlift and Design to Tim Wilson at www.MicrobeOrganics.com aka MicrobeMan
Visit www.MicrobeOrganics.com for more accurate details on his recipes and designs.
NOTICE: Build your own stand. I'll post measurements but get creative! You can make one all out of PVC or wood or anything.... Send me your photo's.... I really want to see your brewer in action and show all the other growers the many ways to do this.
My Stand is made from old 2x4's that were on my property laying around and the red plastic piece that holds the water bucket is the bottom of an old chicken waterer that I cut a whole into. You could easily make something that would support the water bottle better using 2x4's PVC etc.
PARTS LIST FOR THE BREWER:
- Commercial Air Pump: 18 - 35 Watt for 5 Gallon Design. The More Air The Better! ($40.00)
- Braided Nylon Tubing - 1/2" Inside Diameter: Grab 5-10 Feet. (This is the size I use with my ActiveAqua 20 Watt Pump, I'll update soon with the size for the new 35 Watt Pump that we carry now) $10.00
- Nylon Hose Barb - 1/2 in ID x 3/4 in MIP ($4.95)
- PVC Reducer Bushing - 1-1/2" x 3/4" ($1.19)
- PVC Reducing Tee - 1-1/2" x 1-1/2" x 1-1/4" (part# pvc 02400 5900) ($1.50)
- PVC Tee - 1-1/2" x 1-1/2" x 1-1/2" ($1.40)
- PVC Ball Valve 1-1/2" ($10.73)
- 2 PVC 90 Degree Elbows 1-1/2" ($1.34)
- 2 PVC 45 Degree Elbows 1-1/2" ($1.88)
- 1-1/2" PVC Fitting - Socket x NPT Female ($5.46)
- ACE flexible Rubber Coupling 2" to 1.5" ($2.55)
- Bushing - 2" - 1.5" - I found this at ace hardware ($2.50)
- 5 gallon Water Jug without handle - I Found mine at Natural Grocers ($6.00)
- TOTAL = $89.50 with extra tubing and PVC. Then just build your stand.
- My Stand is 2x4 and 26.5" Tall and 15" Wide with one leg extending up to 42" for the Pump Stand.
The rest of the PVC you need 1-1/2" Inside Diameter PVC Get 1 8 Foot piece so you have extra just in case.
Cut with a Mitre Box to make sure every cut is perfectly straight so you don't have leaks.. then file the ends to get the rough edges off. This will make sure you don't have leaks. MITRE BOX
1-1/2" PVC Measurements To Cut:
- 3"
- 3.5"
- 7"
- 2.5"
- 23.5"
- 5"
- 3.5"
Match The Location On The Photo Below :
NOTE: These sizes are based off of my stand and you should construct your own mock up to make sure everything works properly.


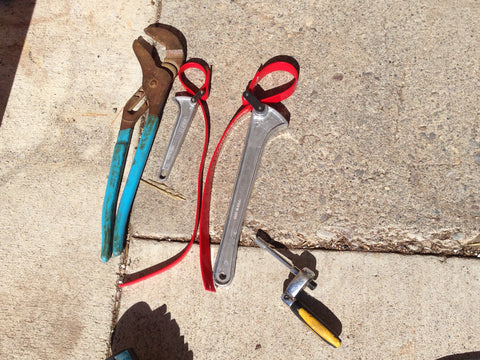
Tools that help to have around:
I use the Pipe Wrench to tighten the Threaded Attachment where the airline goes in... That and a strap wrench for torque. Tight means no leaks!
I use the Socket to tighten the Metal straps on the Rubber Reducer that connects the Water Bottle to the PVC. 5/16" or 8mm Socket.
You might notice a small leak in a few spots the first time you put it together. Typically once you towel dry these areas and add molasses and vermicompost it will stop leaking. Once you clean it fresh it might leak just barely but really not bad. Once I smoothed off the edges of all my cuts and also used a Mitre Box to make them so everything was straight I was able to run the machine with just water without any leaks at all.
In the video I'll show you some tricks to putting it together that help with leaks.


